Technology Resources
Introduction to the micro:bit

What is it?
The micro:bit is a circuit board that is meant to be a tool to teach computer programming. You can think of it as a small computer because it has a programmable chip on it called a microcontroller. It also has an array of 25 LEDs that work as a tiny computer screen. It has a lot of built-in features and you can also connect other devices to it. that help teach about robotics. It brings high-tech down from the clouds and makes it easier to understand.
What features does it have?
The micro:bit has the following built-in components:
Connectors
These are things that allow you to connect other devices to the micro:bit. They are:
- micro USB connector – This is located at the top front of the board and it is used to connect it to your computer to download programs.
- JST connector – The JST is a standard connection type and will let you attach a battery pack to your micro:bit. It is located at the top right corner on the board front.
- Edge connector – This is the copper-colored strip at the bottom of the board. It is used to connect other devices, like LED strips and motors.
Sensors
These are the things that read physical information and share it with the microcontroller. You can write computer code that instructs the micro:bit to do something based on input from one of the sensors. Here is a list of the sensors:
- Accelerometer – This measures motion in three directions, so it can tell if you have dropped it, flipped it, or are moving it forward, backward or side to side.
– This is a standard compass. It measures magnetic fields to determine the direction the micro:bit is facing. - Temperature sensor – The micro:bit uses the surface temperature of the microcontroller for this.
- Light sensor – The micro:bit read light levels using the LEDs as input.
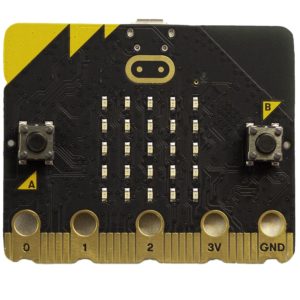
LEDs
- There is an array of 25 red LEDs on the backside of the board. These are programmable and can be used as a computer screen.
- The micro:bit has another LED next to the microUSB connector. This LED lights up when the micro:bit is connected to a computer. It will blink off and on while you are downloading a program to it. One the program is downloaded, it will go back to being lit.
Buttons
There are three buttons on the micro:bit:
- One is located at the top of the display side between the microUSB and the battery connector. This is a reset button. A reset button is used to restart the code you are running.
- Buttons labeled A and B – these are used as inputs. You can program behavior based on either or both of the buttons being pressed.
If you want more detailed information, you can find it at microbit.org/guide/features/.
Next, I will look at how to program the micro:bit.
Pingback: The Teacher's Guide to Action in Robotics Projects | Wonkitz : Support for STEAM Educators