Technology Resources
Tips for sewing a circuit with conductive thread
 If you want to learn about electricity, try sewing a circuit. The only special tools you need are stainless steel thread, a sewable coin cell battery holder, a coin cell battery, and a few LEDs. A pair of needle nose pliers is handy but not necessary. Sewing a circuit is way more user-friendly than using wire and a soldering iron. Even if you are prone to jabbing yourself with the needle, sewing is not nearly as scary as molten lead.
There are some tricks to sewing circuits though, so if you have never sewn before or are new to circuitry, here are some tips so you can keep it fun while you learn:

Start with felt as your fabric
Felt is easy to work with and inexpensive. Start with acrylic felts . They are the least expensive and are available at most crafting stores. You can move up to wool and wool blend felts, or other materials, once you master sewing circuits.
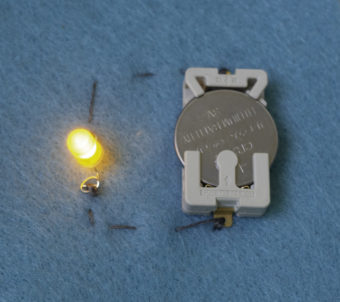
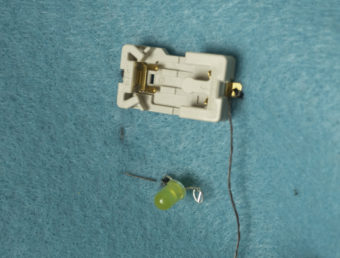
Start with a simple circuit and only one LED
You may be tempted to try sewing a project with microcircuits and several LEDs but you are better off keeping your first project simple. A small project will introduce you to the tools for making a circuit some of the tricks to sewing with conductive thread.
Use embroidery needles
Sharp needles for general sewing have a small eye. It can be hard to get the stainless steel thread through the hole because it frays easily. A solution to this is to use an embroidery needle. Run it through the sewing holes on your battery holder to make sure the eye isn’t too big before you start sewing. If you can’t find embroidery needles, try using a needle threader.
Use short thread lengths
For any sewing, the shorter the thread, the less likely a tangle will occur. This is even more true with stainless steel thread. It is a bit sticky and tends to catch itself. To avoid this, keep your thread lengths to 18 inches or less.
To knot the thread, wrap the end loosely around your index or middle finger then roll it off your finger with your thumb.
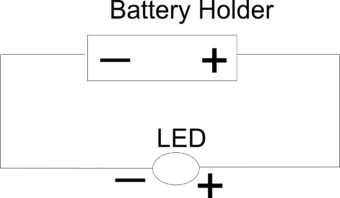
Make sure the thread connects with the metal of the hole
Sew through each connection hole three or four times, making sure the thread comes in contact with the metal of the connection.
Continue the process for each component, making sure your sewing is neat and that you do not cross over existing threads. This will create a short circuit. When you are done, use a drop of clear-drying glue or clear nail polish on each knot to keep them from fraying.
If you are interested in going further with sewable circuits, try this the Wearable Electronics Class on Instructables.